はてなブックマークボタンとは、はてなブックマークが提供しているソーシャル用のボタンになります。このボタンを利用することでサイト閲覧者へのブックマークを促すひとつとなり、ブックマークをしてくれたユーザーがサイトを訪れることなく、サイトをチェックできるようにしてくれるものになります。「Facebook」や「Twitter」などもありますが、今回は「はてなブックマーク」に絞って記載しておきます。
表示する場所として、「投稿ページ」と「特定のカテゴリーページ」に表示してみます。
1.はてなブックマークボタンのコードを作成する

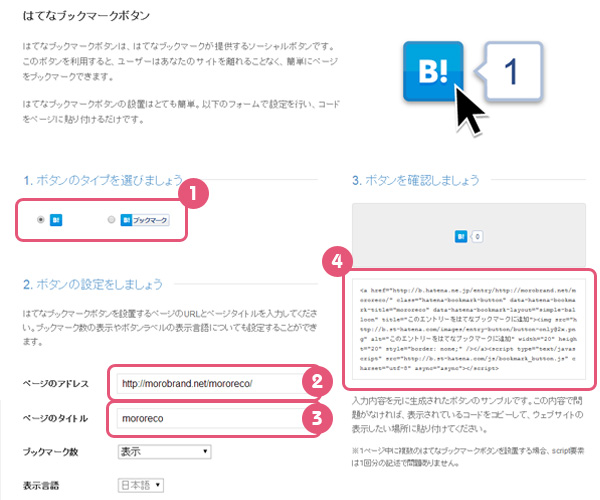
1-1.ボタンのタイプを選びます
今回は左の小さなアイコンを選択ししておきます。
1-2.あなたのサイトURLを入力します。
後ほど変更も出来ますが、サイトのURLを入力しておきましょう。
1-3.ページのタイトル(サイト名)を入力します。
後ほど変更も出来ますが、サイト名を入力しておきましょう。
1-4.右側にコードが表示されます。
表示されたコードを、テキストエディタ貼り付けます。
2.social-button.phpを作成
先ほどのコードを修正していきます。
|
1 2 |
<a href="http://b.hatena.ne.jp/entry/https://morobrand.net/mororeco/" class="hatena-bookmark-button" data-hatena-bookmark-title="mororeco" data-hatena-bookmark-layout="simple-balloon" title="このエントリーをはてなブックマークに追加"><img src="http://b.st-hatena.com/images/entry-button/button-only@2x.png" alt="このエントリーをはてなブックマークに追加" width="20" height="20" style="border: none;" /></a> <script type="text/javascript" src="http://b.st-hatena.com/js/bookmark_button.js" charset="utf-8" async="async"></script> |
こちらの、1行目の<a>タグ内のhrefの値、
|
1 |
<a href="http://b.hatena.ne.jp/entry/https://morobrand.net/mororeco/" class="hatena-bookmark-button" data-hatena-bookmark-title="mororeco" data-hatena-bookmark-layout="simple-balloon" title="このエントリーをはてなブックマークに追加"> |
の部分を、下記のように変更します。
|
1 |
<a href="http://b.hatena.ne.jp/entry/<?php the_permalink(); ?>" class="hatena-bookmark-button" data-hatena-bookmark-title="<?php the_title(); ?>" data-hatena-bookmark-layout="simple-balloon" title="このエントリーをはてなブックマークに追加"> |
- コードのサイトURLの部分を「<?php the_permalink(); ?>」に修正
- ページタイトル部分を「<?php the_title(); ?>」に修正
- 上下を<ul>タグと<li>タグで囲む
そうすると、下記のような全体のコードになります。
|
1 2 3 4 5 6 7 8 |
<ul class="social_buttons"> <li> <a href="http://b.hatena.ne.jp/entry/<?php the_permalink(); ?>" class="hatena-bookmark-button" data-hatena-bookmark-title="<?php the_title(); ?>" data-hatena-bookmark-layout="simple-balloon" title="このエントリーをはてなブックマークに追加"> <img src="http://b.st-hatena.com/images/entry-button/button-only@2x.png" alt="このエントリーをはてなブックマークに追加" width="20" height="20" style="border: none;" /> </a> <script type="text/javascript" src="http://b.st-hatena.com/js/bookmark_button.js" charset="utf-8" async="async"></script> </li> </ul> |
これを「social-button.php」として保存します。
3.content.phpを修正する
表示したいページの先頭と末尾にそれぞれボタンを表示していきます。
|
1 2 3 4 5 6 7 8 9 10 11 12 13 14 15 16 17 18 19 20 21 22 23 24 25 26 27 28 29 30 |
<article> <header class="page-header"><?php the_category_image(); ?></header> <h1 class="page-title"><?php the_title(); ?></h1> <?php if (is_single() && in_category('column')) : get_template_part('social-button'); endif; ?> </header> <section class="entry-content"> <?php the_content(); ?> (…略…) </section> </article> <?php if (is_single()) : if (in_category('column')) : get_template_part('social-button'); endif; ?> <nav class="adjacent_post_links"> <ul> <li class="previous"><?php previous_post_link('%link', '%title', true); ?></li> <li class="next"><?php next_post_link('%link', '%title', true); ?></li> </ul> </nav> (…略…) |
4.表示を確認する
確認してみると、記事の先頭と末尾に、ボタンが表示されているかと思います。
![]()
※補足
今回は「投稿ページ」と「カテゴリーIDが’column’」のページに特定しましたが、複数のカテゴリーに表示する場合は、in_categoryのパラメータを以下のようにします。
|
1 2 3 4 5 |
if (is_single()) : if (in_category( array('column','topics','news','recipe'))) : get_template_part('social-button'); endif; ?> |
以上になります。

